

You do not need to configure every ByTheWeb feature at once.
The recommended setup starts by installing both ByTheWeb plugins, checking how AI engines currently understand your website, establishing your site’s core identity, and then using the SEO & GEO Dashboard to improve your content in a structured way.
Some steps depend on whether your website already uses Yoast SEO or Rank Math SEO. ByTheWeb automatically adapts to the supported SEO provider active on the website.
Step 1: Install and Activate ByTheWeb AI and ByTheWeb GEO
For the recommended complete setup, install and activate both plugins:
- ByTheWeb GEO for GEO, structured data, entity information, AI-readable content signals, SEO/GEO analysis, LLM files, and supported SEO functionality.
- ByTheWeb AI for AI Audit, AI-assisted FAQ generation, Media Optimization, and supported Fix with AI actions.
Starting with ByTheWeb AI 1.9.5 and ByTheWeb GEO 1.3.2, new installations include Getting Started setup flows to help with the initial configuration. ByTheWeb GEO guides you through the website, GEO foundation, and SEO & discovery settings, while ByTheWeb AI can guide you through the initial API connection and verification. The steps below remain the recommended workflow for reviewing and completing your setup in more detail.
The two plugins are separate, but they are designed to work together.
You do not need a ByTheWeb account simply to install or activate them.
If you have not installed the plugins yet, see:
Step 2: Run Your First AI Audit
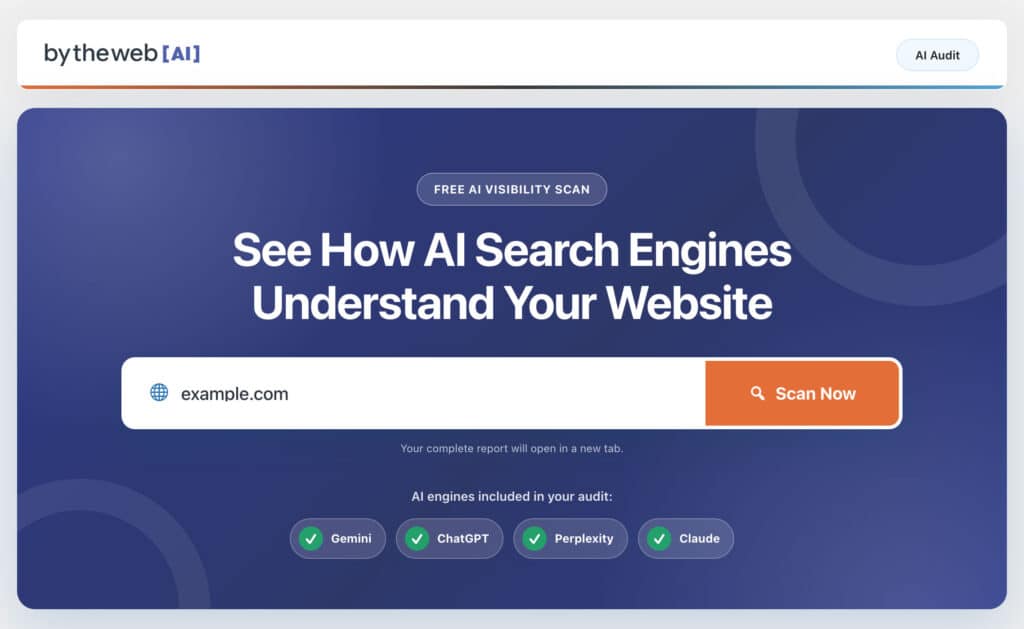
Before changing the website, get a baseline of how AI engines currently understand it.
Open:
ByTheWeb AI > AI Audit
The AI Audit opens the ByTheWeb Website Scanner using your current website domain.
The report can help you review:
- Facts AI engines currently identify about your website
- Information that appears unclear
- Questions your website may not answer clearly
- Public sources and citations returned by supported engines
- Differences between how different AI engines understand the website
ChatGPT and Gemini results are available without connecting an API Key.
Connecting your ByTheWeb account later enables all supported AI Audit engines.
You can also open the scanner directly:
Do not treat the first result as something you need to fix immediately. Keep it as your starting point so you can compare the results again after improving the website.
Step 3: Check Which SEO Setup Your Site Uses
Before configuring SEO-related settings, identify which supported SEO provider is active on the website.
Your setup will normally fall into one of these three paths:
- Yoast SEO is active
- Rank Math SEO is active
- No supported external SEO plugin is active
If Yoast SEO or Rank Math SEO is active, continue using that plugin for overlapping traditional SEO functionality.
ByTheWeb GEO does not attempt to replace those supported SEO controls while they are active.
If neither Yoast nor Rank Math is active, ByTheWeb GEO can provide its own supported traditional SEO functionality.
This distinction becomes important later when configuring SEO Titles, Meta Descriptions, Canonical URLs, indexing controls, Sitemap, robots.txt, and other overlapping SEO features.
For complete compatibility information, see:
Step 4: Configure Your Primary Entity
One of the most important GEO setup steps is clearly identifying who or what the website represents.
Open the Entity & Schema settings in ByTheWeb GEO and configure the Primary Entity.
Choose whether the website primarily represents an:
- Organization
- Person
Complete the available information accurately.
Depending on the selected entity type, this can include information such as:
- Name
- Description
- Phone
- Address
- Official profiles and related URLs
The goal is to provide clear, consistent structured information about the entity behind the website.
Do not add information simply because a field exists. Use information that genuinely describes the person or organization represented by the website.
For more information, see:
and:
Primary Entity – Organization & Person
Step 5: Add Business Locations, Services and Customer Support Information if Relevant
If the website represents a business, review the additional Entity & Schema information that applies to it.
For physical business locations, ByTheWeb GEO can manage supported LocalBusiness information such as:
- Business or branch name
- Business type
- Address
- Phone
- Geographic coordinates
- Opening hours
- Service area
Multiple business locations can be added where relevant.
You can also define supported Services and Customer Support information.
These settings are optional and should only be used when they accurately describe the website or business.
Related guides:
Business Locations & LocalBusiness Schema
Services & Customer Support Schema
Step 6: Connect Your ByTheWeb API Key
If you already connected and verified your API Key during the ByTheWeb AI Getting Started setup, this step is already complete and you can continue to the next step.
At this point, you have already installed the platform, reviewed your current AI visibility, identified your SEO setup, and configured the site’s main entity information.
Now is a good time to connect your ByTheWeb account if you want to use the AI-powered tools during the rest of the optimization process.
Open:
ByTheWeb AI > API Connection & Credits
A connected API Key enables supported cloud AI actions such as:
- Fix with AI
- AI FAQ generation
- AI-assisted image metadata generation
- All supported AI Audit engines
The API Key is validated against the connected website domain.
Connecting the API does not make every ByTheWeb feature paid. Many ByTheWeb GEO tools and manual editing features continue to work locally without consuming AI credits.
For complete instructions, see:
For information about AI credits, see:
Step 7: Review Your Core GEO Settings
Before starting the main content optimization workflow, review the core ByTheWeb GEO settings for your website.
Make sure the relevant content types and GEO functionality are configured for the content you actually want to manage.
You do not need to enable every available option.
The goal is to prepare ByTheWeb GEO to analyze and manage the website content that matters to you, including supported:
- Pages
- Posts
- Custom Post Types
- Taxonomies
The exact options available depend on the individual feature and your WordPress setup.
Step 8: Audit and Improve Your Website Content with the SEO & GEO Dashboard
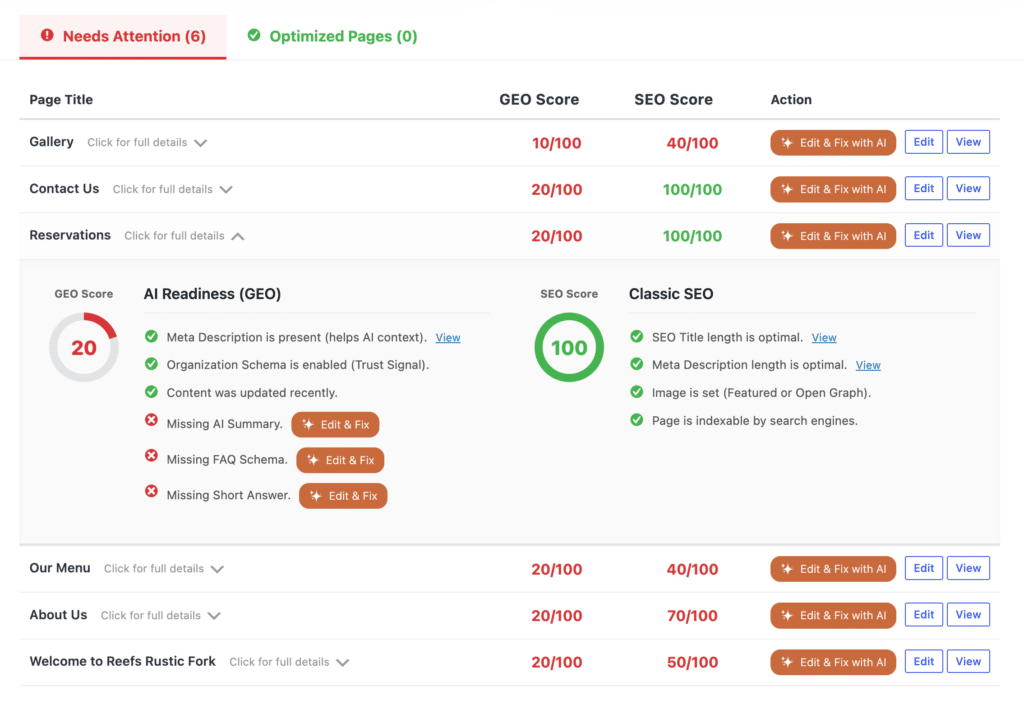
This is the central ongoing workflow in ByTheWeb GEO.
The SEO & GEO Dashboard gives you a site-wide view of the optimization status of your supported content.
Instead of opening pages and posts one by one and trying to remember what needs attention, the Dashboard brings the information together in one place.
You can use it to review supported:
- Pages
- Posts
- Custom Post Types
- Other supported content managed by ByTheWeb GEO
The Dashboard separates content that Needs Attention from content that is already optimized.
Each item can be reviewed individually so you can understand exactly why it received its current score.
The GEO analysis can identify signals such as:
- AI Summary
- Short Answer
- FAQ Schema
- Meta Description as a useful AI context signal
- Organization or other supported Entity signals
- Content freshness
- Other supported GEO readiness checks (may change form time to time)
This gives you a practical AI Readiness (GEO) view of each piece of content rather than a simple list of settings.
When ByTheWeb GEO is also the active SEO provider, the Dashboard can additionally evaluate the supported Classic SEO elements managed by ByTheWeb GEO.
If Yoast SEO or Rank Math SEO is active, those supported external plugins remain responsible for the overlapping traditional SEO functionality. In that setup, use ByTheWeb primarily for its GEO analysis and non-overlapping optimization features.
The Dashboard is designed to turn analysis into action.
Depending on the issue and your setup, you can:
- Open the detailed analysis
- Edit the content
- View the public content
- Use Edit & Fix with AI for supported missing fields when ByTheWeb AI is connected
This means the workflow can move directly from:
Find the problem → Understand what is missing → Edit or Fix with AI
You do not need to optimize every item immediately.
Start with the content that matters most to your website, such as:
- Homepage
- Main service or product pages
- Important landing pages
- Key informational pages
- High-value articles
- Important Custom Post Type content
- Recently published or strategically important content
Then gradually work through the remaining items marked as needing attention.
For a complete explanation of the Dashboard, scoring system, checks, and actions, see:
Step 9: Improve Individual Content with AI Summary, Short Answer and FAQ
The Dashboard helps you identify what needs attention. The next step is improving the individual content itself.
For important pages, posts, Custom Post Types, and other supported content, review the GEO elements that are missing or incomplete.
AI Summary and Short Answer
The AI Summary & Short Answer fields help make the purpose and important information of a page more explicit.
Short Answer provides a concise answer or statement representing the main point of the content.
AI Summary provides a structured summary of the important information on the page.
You can manage these fields manually.
When ByTheWeb AI is installed and connected, supported Fix with AI actions can help generate them.
For more information, see:
FAQ Schema
The FAQ Schema feature lets you turn important questions and answers into structured FAQ data.
You can:
- Add FAQs manually
- Edit and reorder questions and answers
- Generate FAQ suggestions with AI
- Output FAQPage structured data
- Display FAQs visibly when desired
Focus on useful questions that clarify the actual content rather than adding FAQs only to improve a score.
For the full workflow, see:
Step 10: Configure llms.txt and llms-full.txt
ByTheWeb GEO can generate llms.txt and llms-full.txt files for your website.
These files provide structured, AI-oriented representations of selected website content.
Review:
- Whether
llms.txtshould be enabled - Whether
llms-full.txtshould be enabled - Which supported post types should be included
- Which supported taxonomies should be included
- The optional AI Introduction
- Individual content that should be excluded where necessary
ByTheWeb considers supported indexability information when determining eligible content.
You can also exclude individual content specifically from the LLM files without necessarily changing its normal search-engine indexing status.
If another supported plugin is also configured to generate the same LLM files, review the compatibility warning and avoid running competing generators.
For detailed configuration, see:
Step 11: Configure ByTheWeb SEO Tools Only If ByTheWeb GEO Is Your SEO Provider
This step applies only when Yoast SEO and Rank Math SEO are not active and ByTheWeb GEO is responsible for the website’s supported traditional SEO functionality.
If Yoast SEO or Rank Math SEO is active as your supported SEO provider, skip this step and continue managing these overlapping SEO functions through your active SEO plugin.
When ByTheWeb GEO is your SEO provider, review the supported SEO tools that apply to the website.
These can include:
- Title & Description Templates
- Canonical URL & Robots
- Index / Noindex settings
- Social Image / Open Graph
- XML Sitemap
- Robots.txt AI Policy Manager
Title and Description Templates
Configure reusable SEO Title and Meta Description patterns where appropriate.
Individual supported content can still use its own values.
Canonical and Indexing Controls
Review Canonical URLs and Index / Noindex decisions for important content.
These decisions can also affect how ByTheWeb handles supported discovery outputs.
XML Sitemap
Review which supported post types and taxonomies should appear in the Sitemap.
Content that is not intended for indexing should not automatically be treated the same as public indexable content.
Robots.txt AI Policy Manager
Review access rules for supported AI crawlers.
ByTheWeb uses an open-by-default approach unless you choose to restrict specific supported crawlers.
If you change crawler policies, review the final public robots.txt output afterward.
For detailed instructions, use the individual Help Center guides for each feature.
Step 12: Review and Optimize Your Images
If ByTheWeb AI is installed, open:
ByTheWeb AI > Media Opt.
The Image Metadata Optimization screen gives you a central place to review important image metadata.
You can identify and manage fields such as:
- Alt Text
- Title
- Caption
- Description
You can edit these fields manually without using AI credits.
If your API Key is connected, you can also generate supported image metadata with AI.
Start with images used in important content rather than feeling that the entire Media Library must be completed immediately.
For more information, see:
Step 13: Repeat the AI Audit and Review Your Progress Every Few Weeks
The first AI Audit gives you a baseline.
It should not be the last time you check the website.
A good ongoing routine is to return every few weeks and review both:
- AI Audit
- SEO & GEO Dashboard
Run the AI Audit again and compare the results with your earlier scans.
Look for changes in:
- Facts AI engines identify about the website
- Information that remains unclear
- Questions that are still unresolved
- Sources being used
- Differences between supported AI engines
Then return to the SEO & GEO Dashboard and review:
- New content that needs attention
- Existing content whose GEO score can be improved
- Missing AI Summaries
- Missing Short Answers
- Missing FAQ Schema
- Other supported GEO issues
- SEO issues when ByTheWeb GEO is also your active SEO provider
Update the website where the findings indicate that important information is missing, outdated, ambiguous, or poorly structured.
Then continue the cycle over time:
Audit → Review → Improve → Publish → Audit Again
GEO is not a one-time setup.
Your website changes, new content is published, business information evolves, and AI engines continuously rediscover public information.
Regular review helps keep your website clear, accurate, structured, and easier for both search engines and AI systems to understand.
Recommended Setup Order at a Glance
For the complete recommended workflow:
- Install and activate ByTheWeb AI and ByTheWeb GEO.
- Run your first AI Audit.
- Identify your active SEO provider.
- Configure your Primary Entity.
- Add relevant Business Locations, Services, and Customer Support information.
- Connect your ByTheWeb API Key.
- Review your core GEO settings.
- Audit and improve your website content through the SEO & GEO Dashboard.
- Improve individual content with AI Summary, Short Answer, and FAQ.
- Configure llms.txt and llms-full.txt.
- If ByTheWeb GEO is your SEO provider, configure its SEO, Sitemap, and robots.txt tools. If Yoast or Rank Math is active, skip this step.
- Review and optimize image metadata.
- Repeat the AI Audit and review the SEO & GEO Dashboard every few weeks.
You do not need to optimize everything on the first day.
Start with your site’s identity and most important content, use the Dashboard to prioritize the work, and improve the website gradually.