ByTheWeb AI Features
Powerful SEO & GEO Tools, Simple for Everyone.


Our Toolkit
AI Content Creation
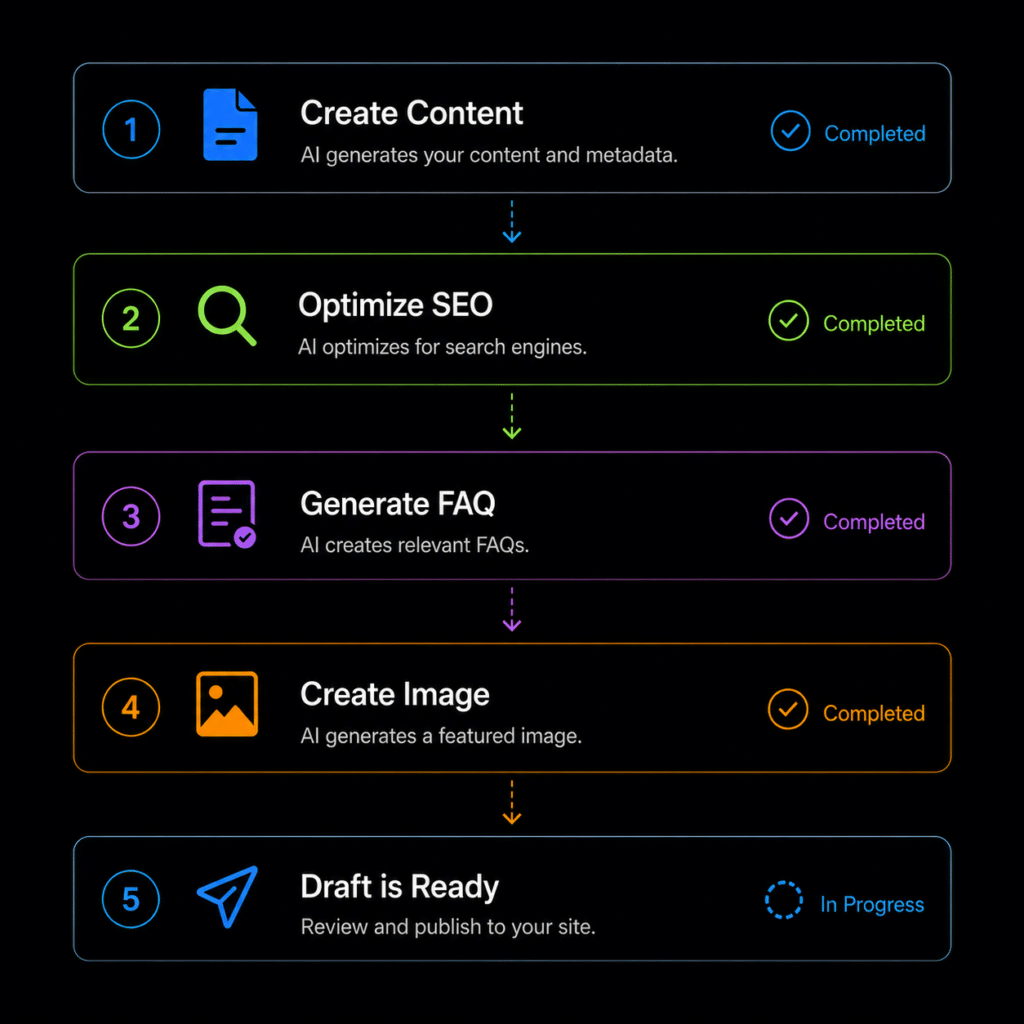
Create complete, structured, SEO-optimized articles in 4 simple steps using our AI Article Wizard. Too busy? Turn on Auto-Pilot. Enter your topics, set your schedule, and let the system automatically write and publish high-quality drafts while you sleep.
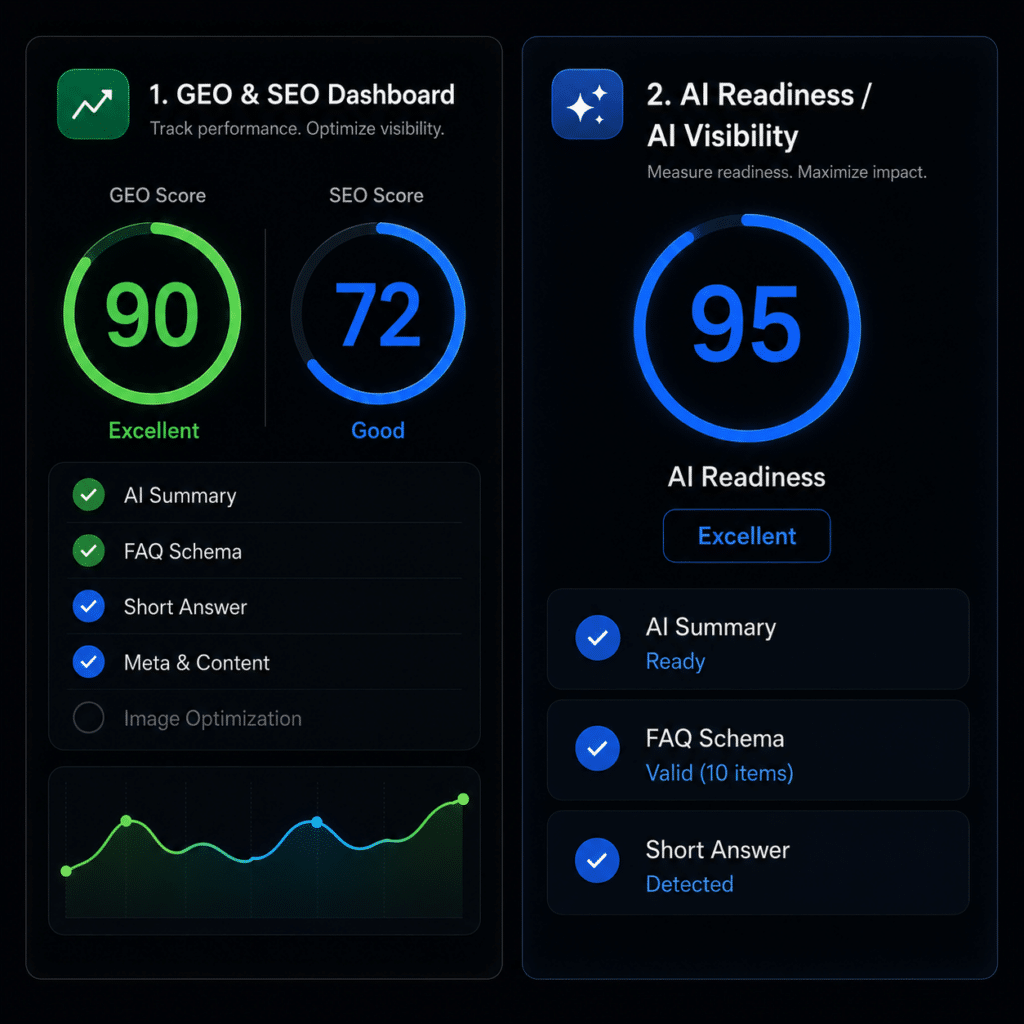
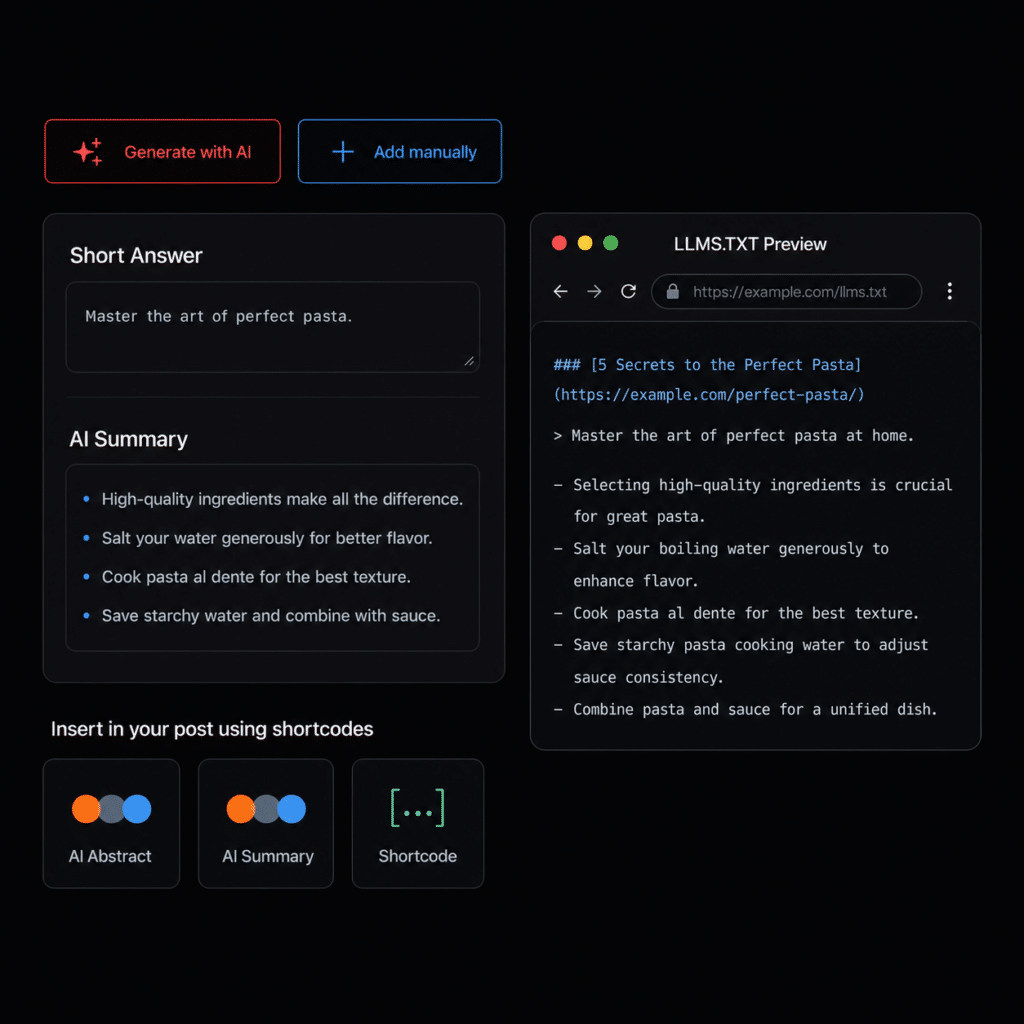
- Provide AI search engines (like ChatGPT, Claude, and Gemini) with exactly what they are looking for. The “Short Answer” gives a direct one-sentence response, while the “AI Summary” provides a scannable list of key facts, ensuring your content is prime for AI extraction and direct answers.
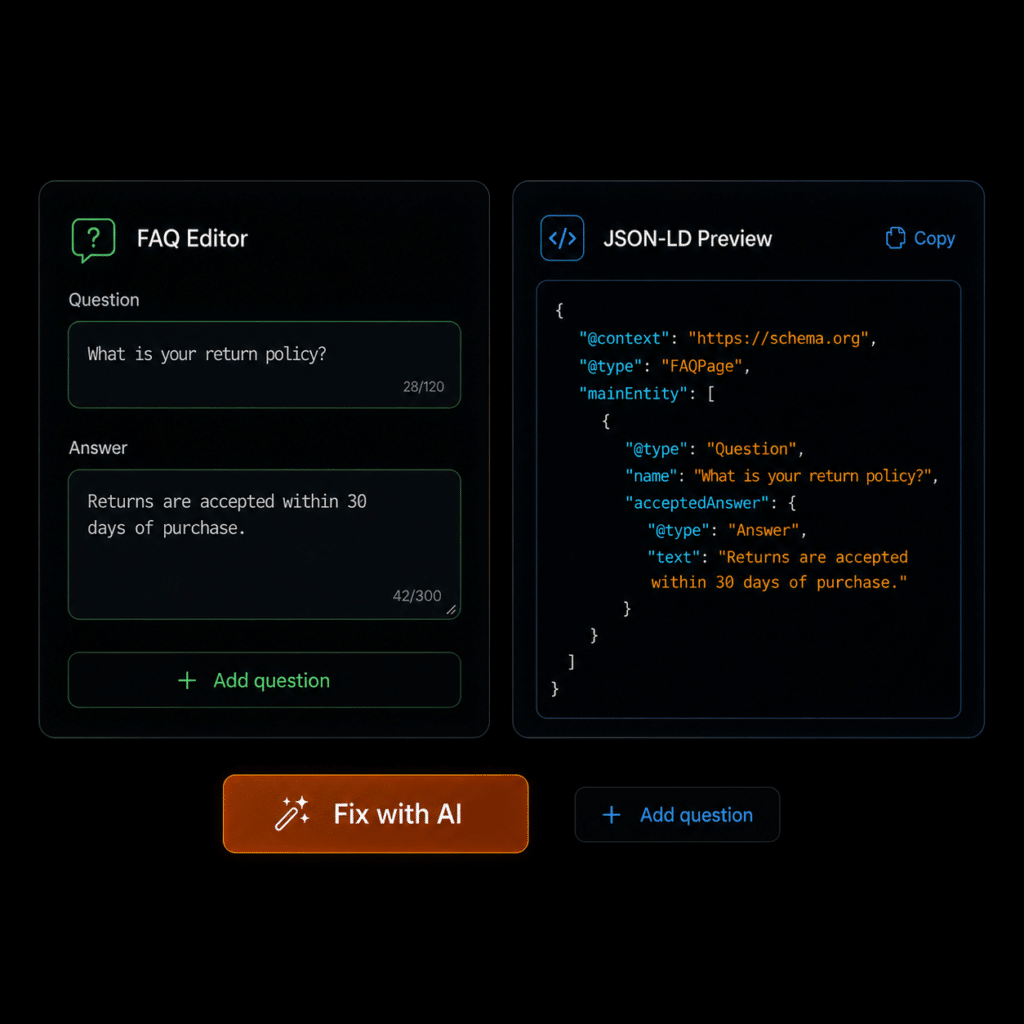
- Turn your content into clear, structured answers that search engines and AI platforms can easily understand. With FAQ Schema, you can add rich-results-ready questions and answers to any page or post – either behind the scenes as JSON-LD or visibly on the page with an Elementor widget or with a shortcode.
- Turn ideas into complete WordPress drafts in minutes. The AI Article Wizard suggests relevant topics for your site, then helps you create structured, SEO-friendly, and AI-readable articles with FAQs, internal links, and featured images – all from one guided workflow inside your dashboard.
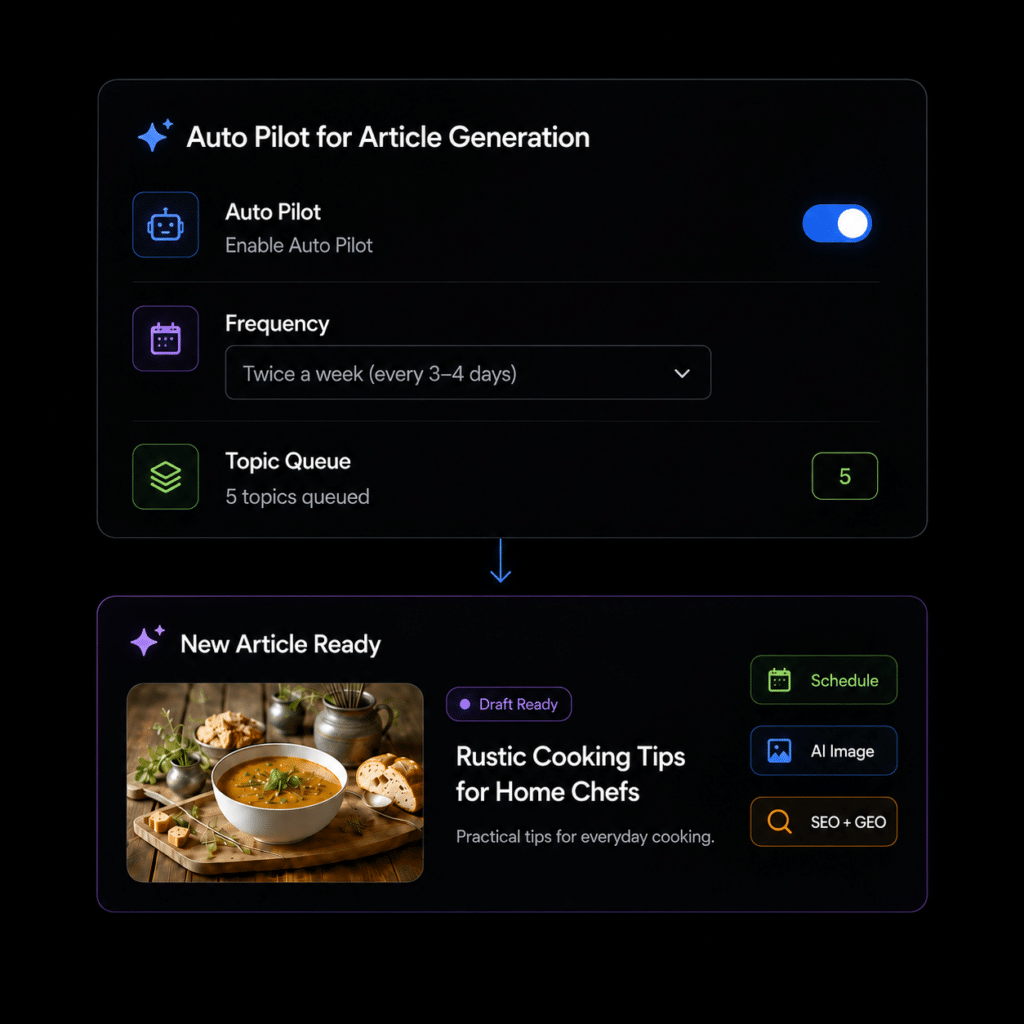
- Automate your content creation workflow with Auto Pilot. Set your publishing schedule, build a topic queue, and let the system generate ready-to-review WordPress drafts for you in the background. It uses the same AI-powered workflow for SEO, GEO, FAQs, internal links, and featured images – automatically and at scale.
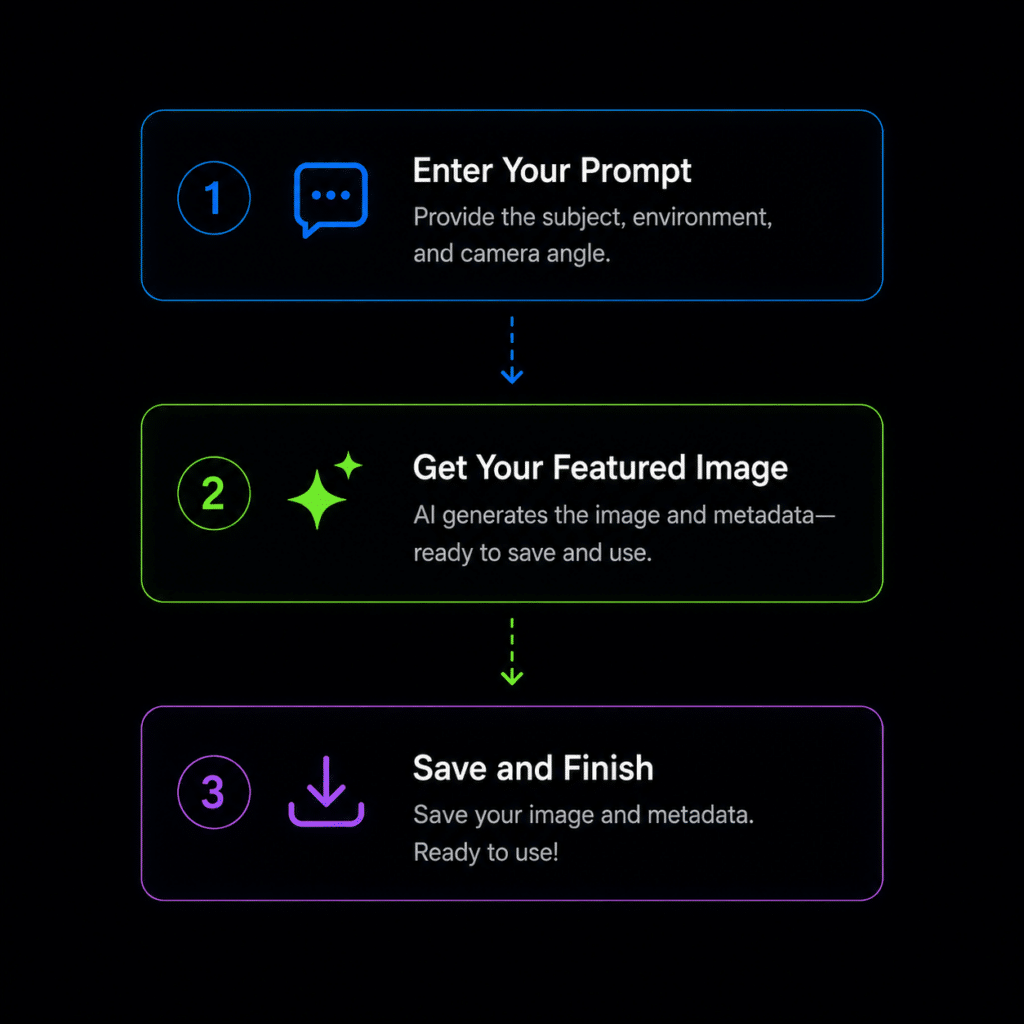
- Generate custom featured images without leaving your WordPress dashboard. The AI Image Generator helps you create unique visuals for your posts and automatically prepares the image metadata – including alt text, title, caption, and description – so every image is ready for SEO, accessibility, and AI discovery.
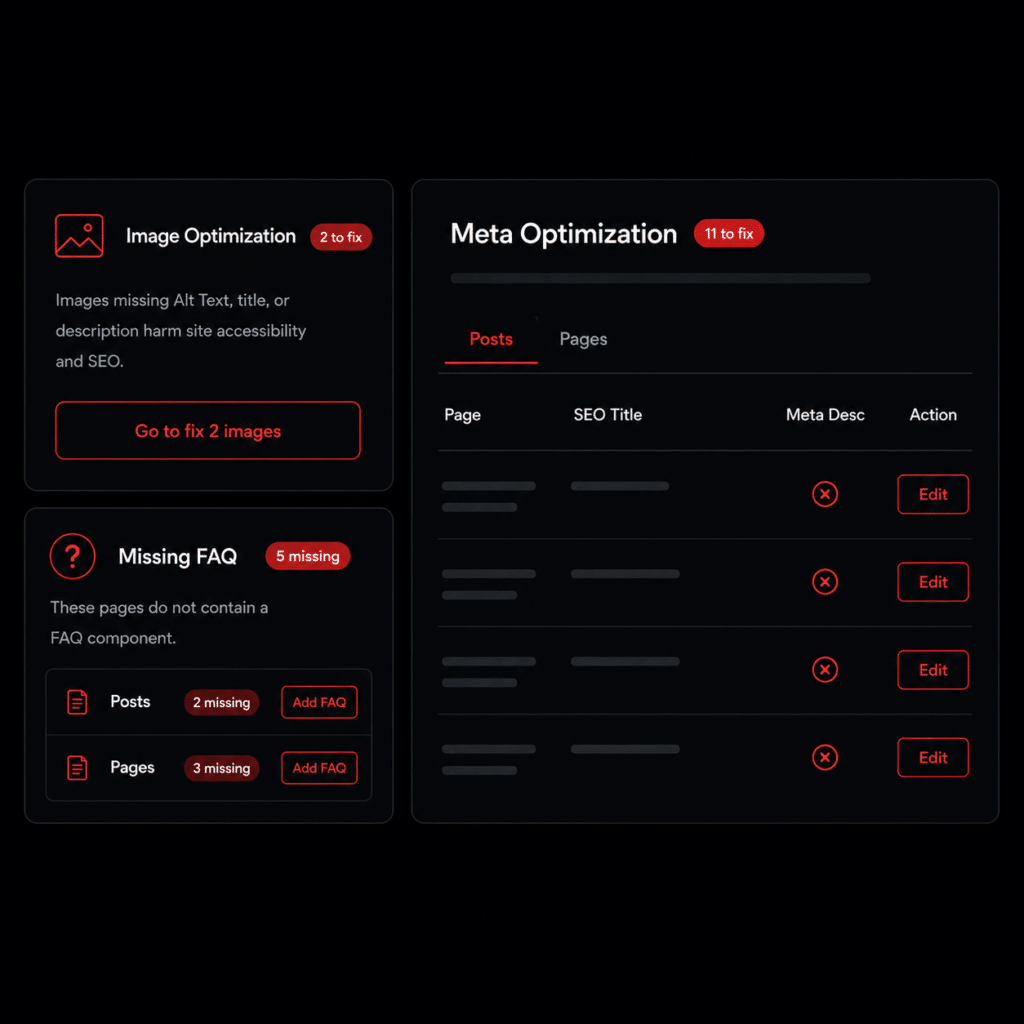
- Improve every image’s SEO, accessibility, and AI readability with a complete image metadata audit. Quickly detect missing alt text, titles, captions, and descriptions across your site, then update them manually or let AI generate optimized metadata for selected fields in just a few clicks.
AI Visibility & GEO Readiness
Create complete, structured, SEO-optimized articles in 4 simple steps using our AI Article Wizard. Too busy? Turn on Auto-Pilot. Enter your topics, set your schedule, and let the system automatically write and publish high-quality drafts while you sleep.
- Know exactly how ready your content is for Google, ChatGPT, Gemini, and other AI platforms. The Scored SEO & GEO Audit Dashboard gives every page a clear optimization score, highlights missing or incomplete elements, and helps you quickly fix the issues that impact search visibility, AI readability, and content performance.
- Instantly discover what’s missing across your website. Site Analysis & Alerts gives you a centralized view of SEO, GEO, image optimization, and content-readability issues – helping you quickly identify gaps, prioritize fixes, and improve your site’s visibility for both search engines and AI platforms.
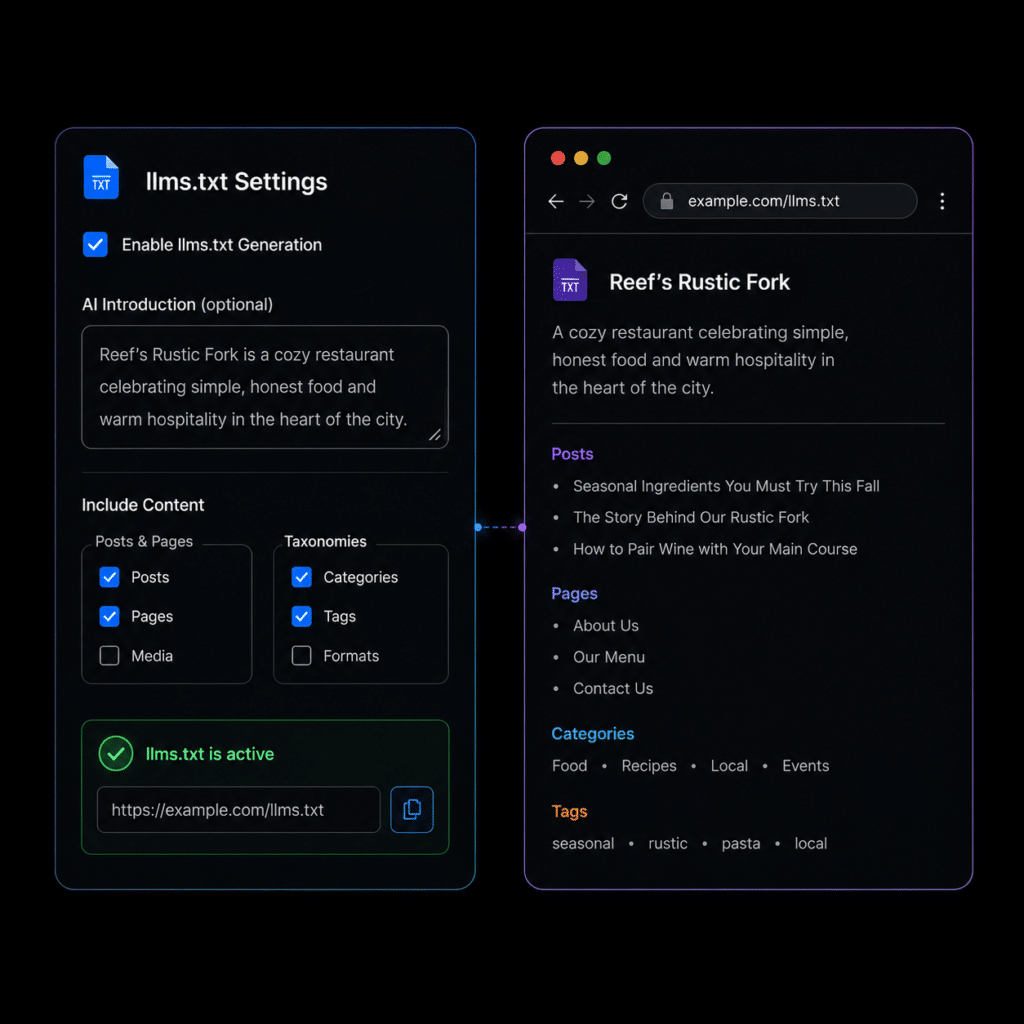
- Help AI engines understand your website faster with clean, structured Markdown files built for Large Language Models. ByTheWeb GEO automatically generates an AI-readable llms.txt index, and can also create an optional llms-full.txt file with a fuller version of your public, indexable content – including Short Answers, AI Summaries, cleaned page content, taxonomy descriptions, and important links.
- Provide AI search engines (like ChatGPT, Claude, and Gemini) with exactly what they are looking for. The “Short Answer” gives a direct one-sentence response, while the “AI Summary” provides a scannable list of key facts, ensuring your content is prime for AI extraction and direct answers.
- Turn your content into clear, structured answers that search engines and AI platforms can easily understand. With FAQ Schema, you can add rich-results-ready questions and answers to any page or post – either behind the scenes as JSON-LD or visibly on the page with an Elementor widget or with a shortcode.
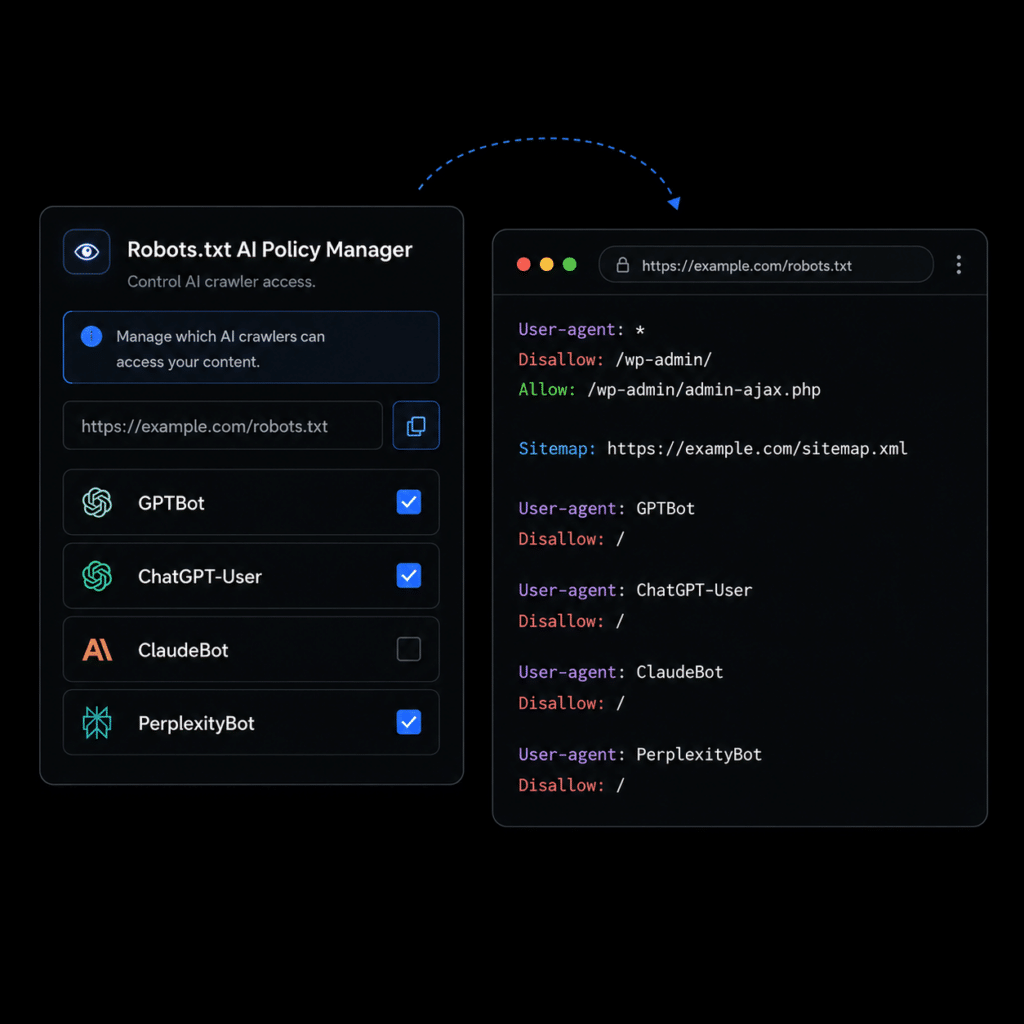
- Control how AI crawlers and search bots access your public website. ByTheWeb GEO keeps your site open by default, adds your sitemap to robots.txt, and lets you selectively block specific AI and search user-agents such as GPTBot, ChatGPT-User, OAI-SearchBot, ClaudeBot, PerplexityBot, Google-Extended, Applebot-Extended, Bingbot, Amazonbot, and Meta AI fetchers.
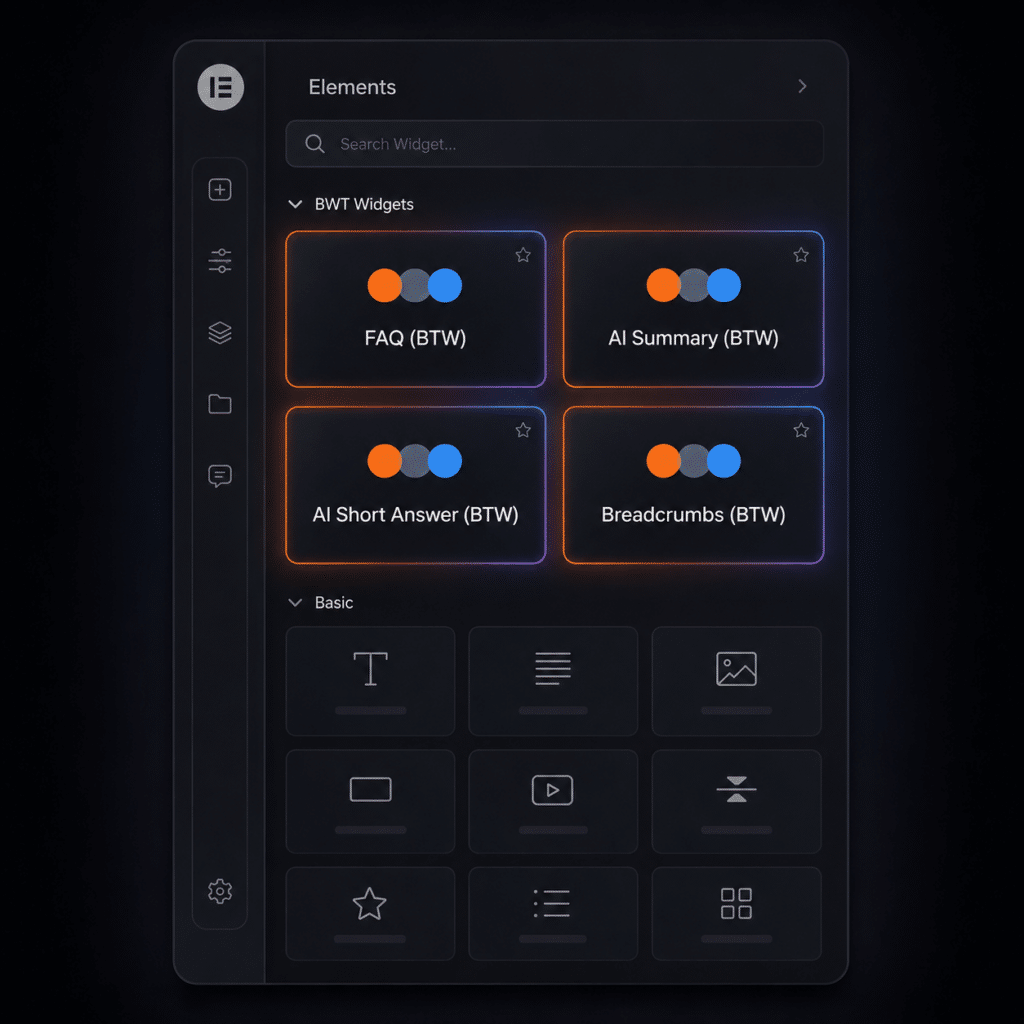
- Display your AI-optimized content directly inside Elementor. ByTheWeb GEO includes dedicated widgets for AI Summary, AI Short Answer, and Breadcrumbs, so your most important GEO content can be visible, styled, and reusable across your WordPress pages.
Structured Data & Trust Signals
Create complete, structured, SEO-optimized articles in 4 simple steps using our AI Article Wizard. Too busy? Turn on Auto-Pilot. Enter your topics, set your schedule, and let the system automatically write and publish high-quality drafts while you sleep.
- Turn your content into clear, structured answers that search engines and AI platforms can easily understand. With FAQ Schema, you can add rich-results-ready questions and answers to any page or post – either behind the scenes as JSON-LD or visibly on the page with an Elementor widget or with a shortcode.
- Help search engines and AI platforms understand the purpose of every page. Smart Page Type Schema lets you assign the right structured data type – such as AboutPage, ContactPage, FAQPage, or SearchResultsPage – or use automatic detection to keep your website clearer, more organized, and AI-readable.
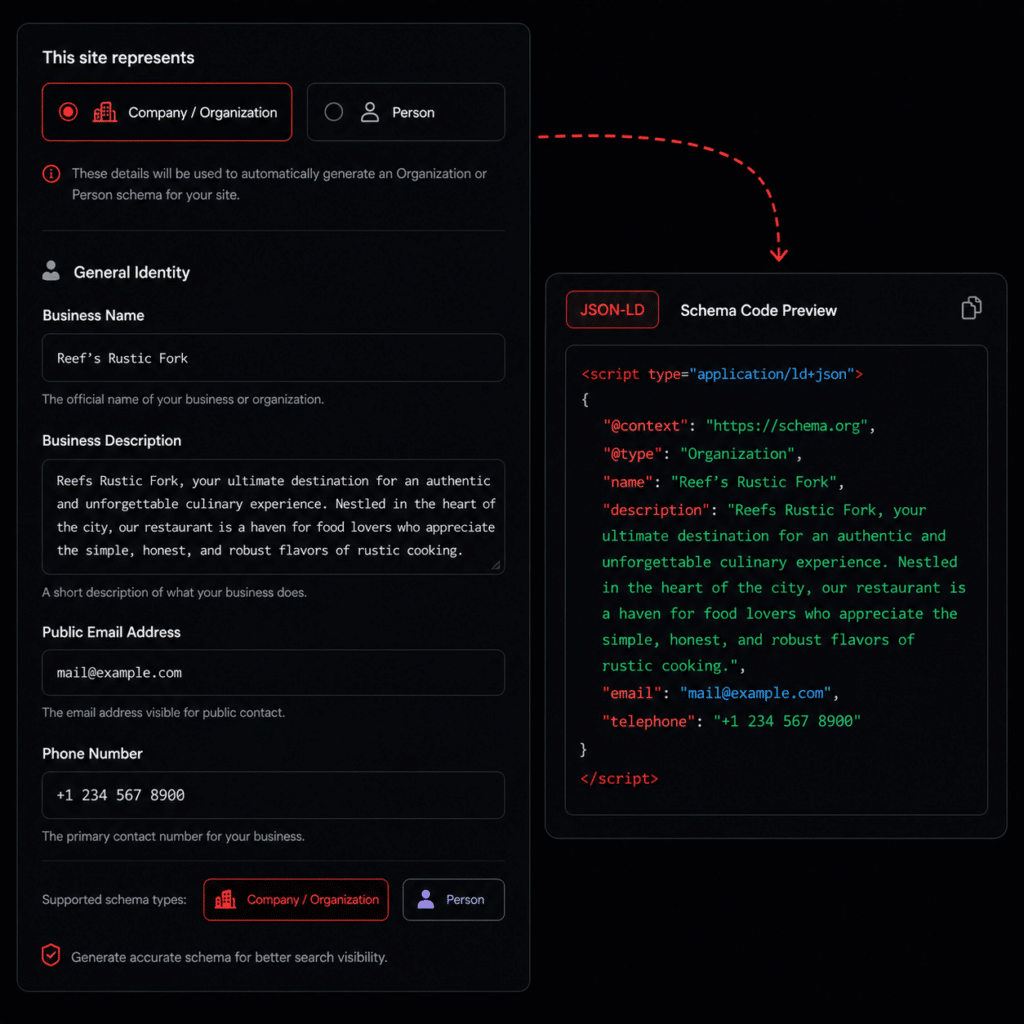
- Build stronger trust signals for your website with structured Company and Person Schema. Define whether your site represents a business, organization, or an individual, and generate clean JSON-LD that helps Google and AI platforms better understand your identity, authority, contact details, and brand context. Now with sameAs entity links and ContactPoint support, your structured identity signals can connect your website to official brand profiles, support channels, and trusted external references.
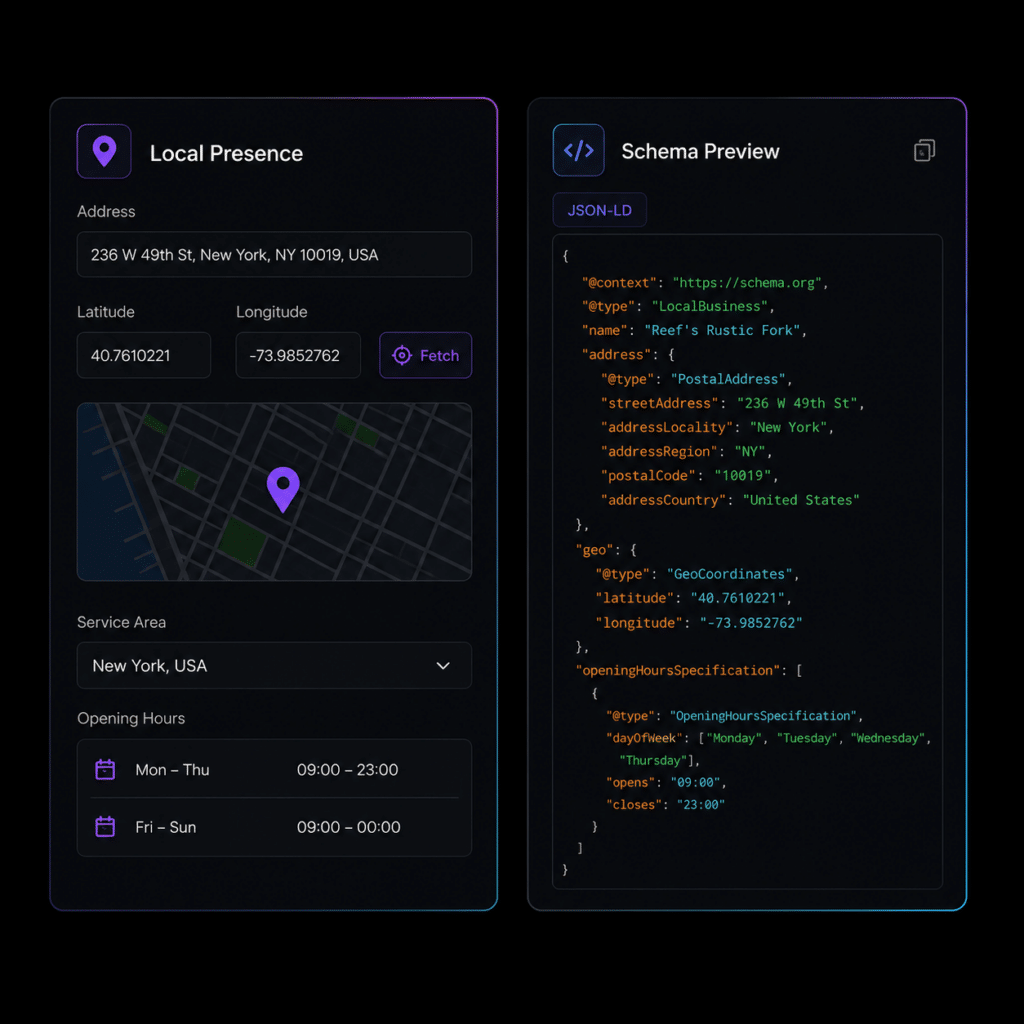
- Make your local business easier to understand, discover, and trust. Local Business Schema lets you define your address, service area, opening hours, map location, and key business details, then outputs clean JSON-LD that strengthens local SEO, AI readability, and business context. Now with Service Schema support, ByTheWeb GEO can also help describe the primary service your business offers, giving search engines and AI platforms clearer context about what you do – not just where you are.
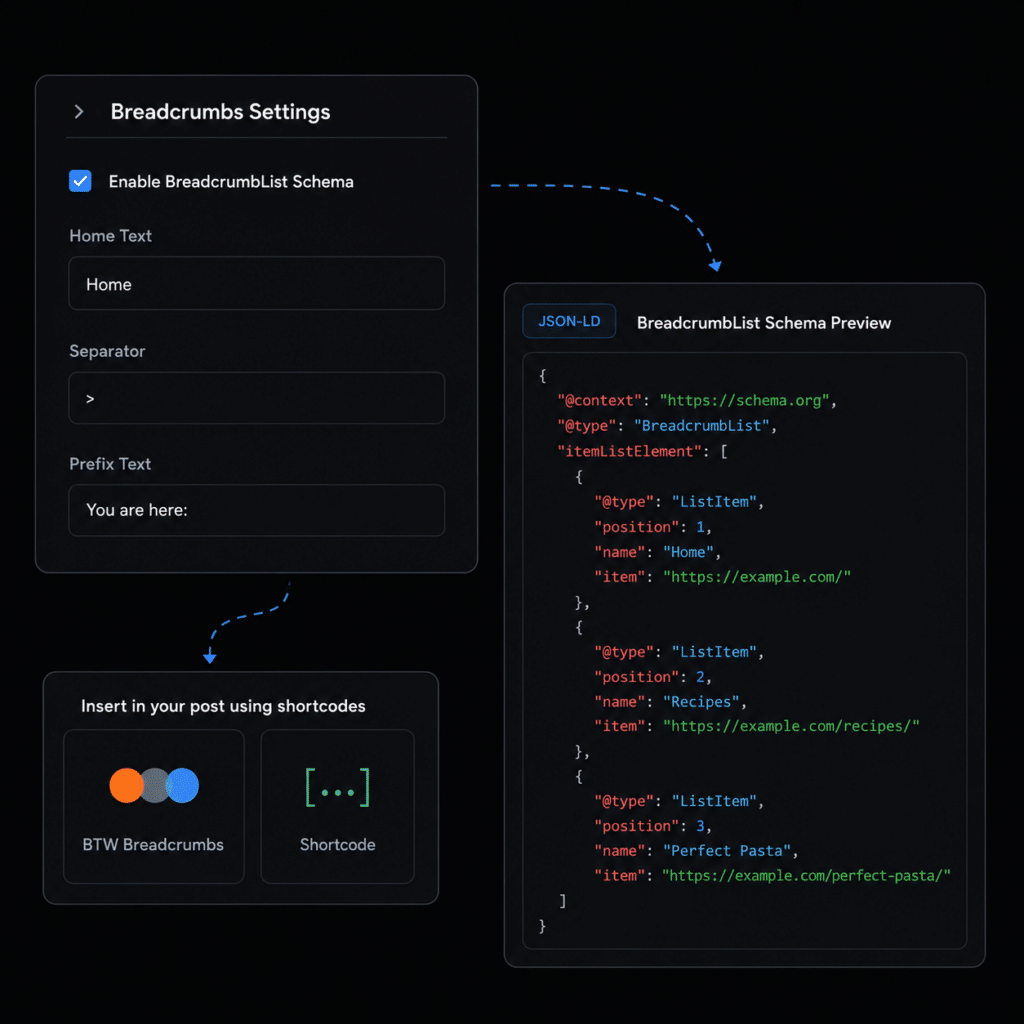
- Make your website structure easier to understand with BreadcrumbList Schema. Generate clean JSON-LD that shows how each page fits within your site hierarchy, while optionally displaying user-friendly breadcrumbs on the page. A simple way to improve navigation, SEO context, and AI readability.
SEO Controls
Create complete, structured, SEO-optimized articles in 4 simple steps using our AI Article Wizard. Too busy? Turn on Auto-Pilot. Enter your topics, set your schedule, and let the system automatically write and publish high-quality drafts while you sleep.
- Make your website structure easier to understand with BreadcrumbList Schema. Generate clean JSON-LD that shows how each page fits within your site hierarchy, while optionally displaying user-friendly breadcrumbs on the page. A simple way to improve navigation, SEO context, and AI readability.
- Improve every image’s SEO, accessibility, and AI readability with a complete image metadata audit. Quickly detect missing alt text, titles, captions, and descriptions across your site, then update them manually or let AI generate optimized metadata for selected fields in just a few clicks.
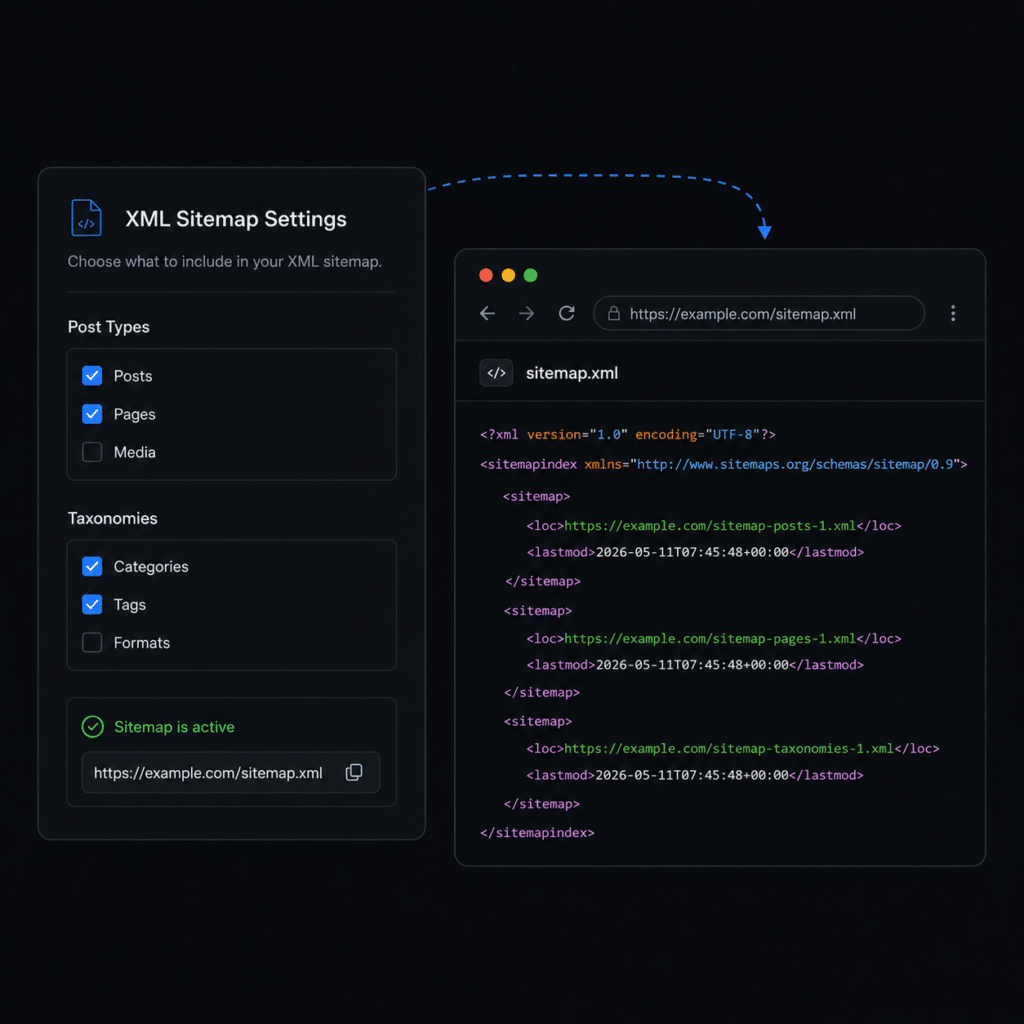
- Make your website easier to crawl and understand with a clean, automatically updating XML sitemap. Select the exact post types and taxonomies you want to include, generate a highly structured sitemap.xml file, and help search engines find your most important pages faster and more efficiently.
- Control how AI crawlers and search bots access your public website. ByTheWeb GEO keeps your site open by default, adds your sitemap to robots.txt, and lets you selectively block specific AI and search user-agents such as GPTBot, ChatGPT-User, OAI-SearchBot, ClaudeBot, PerplexityBot, Google-Extended, Applebot-Extended, Bingbot, Amazonbot, and Meta AI fetchers.
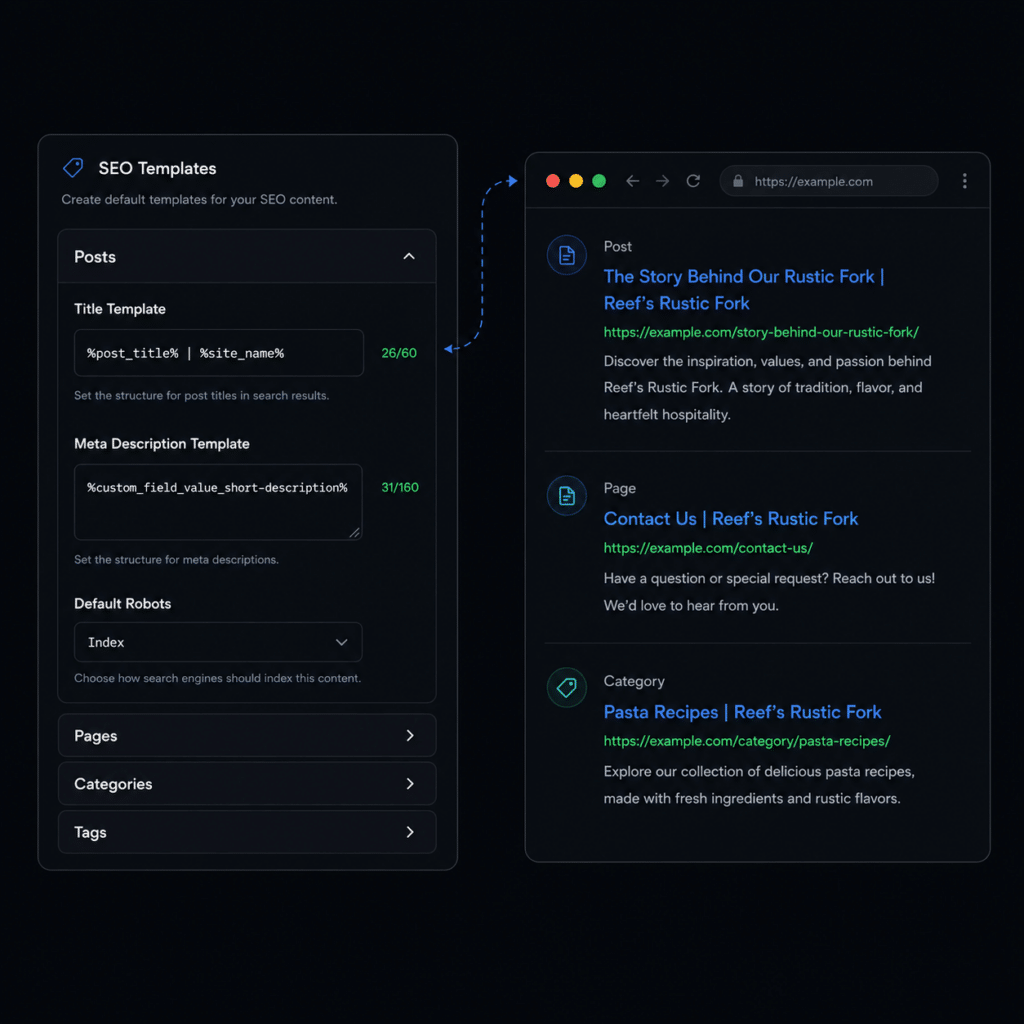
- Save time and keep your metadata consistent with reusable SEO title and meta description templates. Define smart templates for posts, pages, taxonomies, and custom post types, then use dynamic variables to automatically generate optimized search snippets across your website.
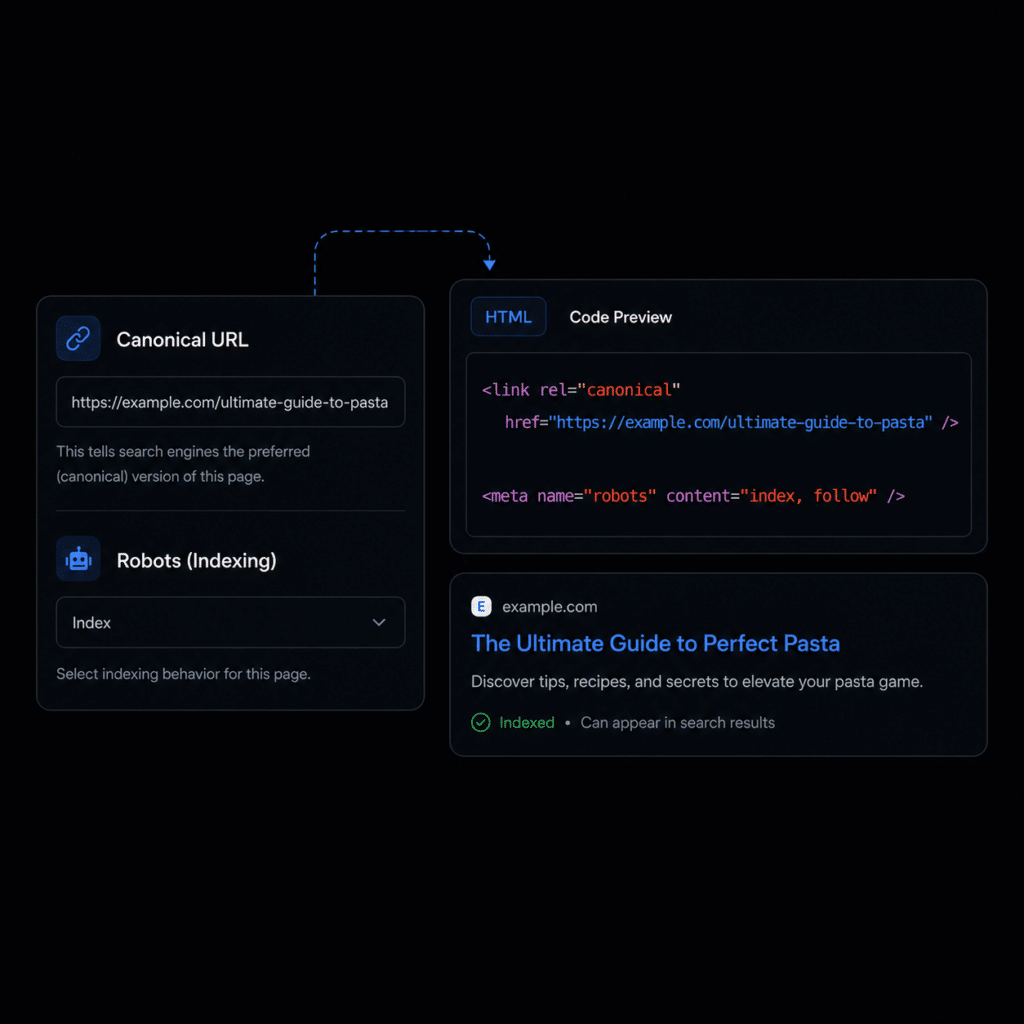
- Give search engines clear instructions for every page. Canonical & Robots Controls let you define the preferred URL, manage indexing behavior, and preview the generated HTML code – helping you reduce duplicate-content risks, improve crawl clarity, and keep your technical SEO foundation clean.
- Make every shared link look professional and clickable. Open Graph Social Image lets you choose the image that appears when your content is shared on platforms like Facebook, helping you improve brand consistency, visual appeal, and engagement from social media traffic.
